
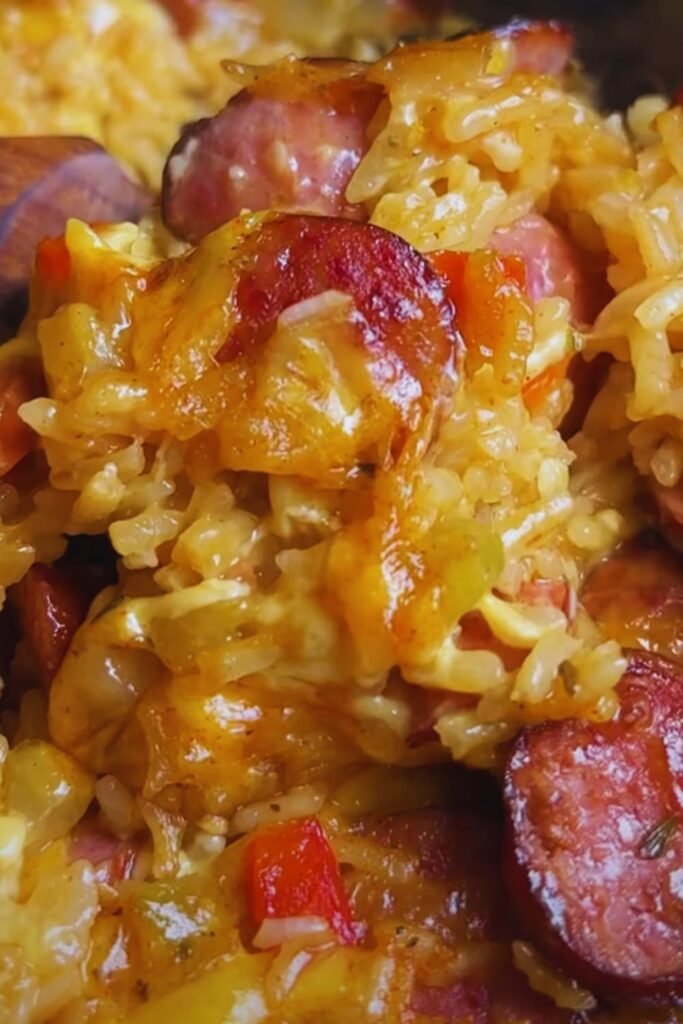
There’s something magical about the combination of smoky kielbasa, cheesy goodness, and perfectly cooked rice that makes my heart sing. As someone who’s been cooking comfort food for over two decades, I can confidently say that my Cheesy Kielbasa and Rice recipe has been a consistent crowd-pleaser at family gatherings, potlucks, and weeknight dinners alike. This one-pot wonder strikes the perfect balance between convenience and flavor, making it my go-to recipe when I need something hearty, delicious, and fuss-free.
I’ve perfected this recipe through countless iterations, experimenting with different cheeses, seasonings, and cooking techniques. Today, I’m thrilled to share my ultimate version with you – one that guarantees perfectly cooked rice, beautifully browned kielbasa, and a cheese sauce that’s creamy without being overwhelming. Whether you’re a busy parent looking for a quick dinner solution or someone who simply appreciates good, honest comfort food, this Cheesy Kielbasa and Rice recipe deserves a spot in your regular rotation.
Why You’ll Love This Recipe
Before we dive into the details, let me tell you why this recipe has become a staple in my household:
- One-Pot Wonder: Everything cooks in a single pot, meaning fewer dishes and less cleanup.
- Budget-Friendly: Kielbasa goes a long way, and the other ingredients are pantry staples.
- Kid-Approved: The mild, cheesy flavor is a hit with even the pickiest eaters.
- Versatile: Easy to customize with different vegetables or seasonings.
- Quick & Easy: Ready in about 30 minutes from start to finish.
- Leftovers Master: Tastes even better the next day!
Ingredients You’ll Need
For this recipe to serve 4-6 people, you’ll need:
- 1 pound kielbasa sausage, sliced into ¼-inch rounds
- 1 medium onion, diced (about 1 cup)
- 2 cloves garlic, minced
- 1 red bell pepper, diced
- 2 cups uncooked long-grain white rice
- 4 cups chicken broth
- 1 teaspoon paprika (smoked paprika is even better!)
- ½ teaspoon dried thyme
- ¼ teaspoon black pepper
- 2 cups shredded cheddar cheese (I prefer sharp cheddar)
- ½ cup shredded Monterey Jack cheese
- 3 tablespoons unsalted butter
- 2 tablespoons freshly chopped parsley (for garnish)
- Optional: ¼ teaspoon cayenne pepper for a little heat
Equipment Needed
Nothing fancy required here:
- Large skillet or Dutch oven with a lid
- Wooden spoon or spatula
- Measuring cups and spoons
- Sharp knife and cutting board
- Cheese grater (if using block cheese)
Step-by-Step Instructions
1. Prepare the Kielbasa and Vegetables
I always start by browning the kielbasa – this step is crucial for developing depth of flavor!
- Heat your large skillet or Dutch oven over medium-high heat (no oil needed as the kielbasa will release its own fat).
- Add the sliced kielbasa and cook for 2-3 minutes until it begins to brown.
- Flip the pieces and brown the other side for another 2 minutes.
- Remove about half of the kielbasa and set aside (we’ll use this as a topping later).
- Reduce heat to medium and add the diced onion to the pan with the remaining kielbasa.
- Cook for 3-4 minutes until the onion becomes translucent.
- Add the minced garlic and diced bell pepper, cooking for another 1-2 minutes until fragrant.

2. Cook the Rice
Now it’s time to add the rice and build those flavors:
- Add the uncooked rice to the skillet, stirring to coat in the kielbasa drippings.
- Toast the rice for about 1 minute, stirring constantly.
- Pour in the chicken broth and add the paprika, thyme, and black pepper.
- Stir everything together and bring to a boil.
- Once boiling, reduce heat to low, cover, and simmer for 15-18 minutes, or until the rice has absorbed most of the liquid and is tender.
- Occasionally check and give a gentle stir to prevent sticking.
3. Add the Cheese and Finish
The final touch that transforms this dish:
- When the rice is tender, add the butter and stir until melted.
- Remove the skillet from heat.
- Add 1½ cups of the cheddar cheese and all of the Monterey Jack cheese.
- Stir gently until the cheese is melted and thoroughly incorporated.
- Top with the reserved browned kielbasa pieces and the remaining ½ cup of cheddar cheese.
- Cover for 2-3 minutes to allow the top cheese to melt.
- Sprinkle with fresh parsley before serving.
Nutritional Information
For those watching their nutritional intake, here’s a breakdown per serving (based on 6 servings):
| Nutrient | Amount per Serving |
|---|---|
| Calories | 520 |
| Protein | 22g |
| Carbohydrates | 45g |
| Fat | 28g |
| Saturated Fat | 14g |
| Fiber | 2g |
| Sodium | 890mg |
| Calcium | 250mg |
| Iron | 2mg |
Recipe Variations to Try
One of the things I love most about this recipe is how adaptable it is. Here are some of my favorite variations:
Veggie Loaded Version
Double the vegetables and add:
- 1 cup diced zucchini
- 1 cup sliced mushrooms
- ½ cup frozen peas (add in the last 5 minutes of cooking)
Cajun Style
Add these seasonings for a spicy kick:
- 1 tablespoon Cajun seasoning (reduce salt if the seasoning contains salt)
- ¼ teaspoon cayenne pepper
- 1 diced jalapeño (seeds removed for less heat)
Mediterranean Twist
Try these additions:
- 1 cup cherry tomatoes, halved
- ¼ cup sliced olives
- 1 tablespoon Italian herbs instead of thyme
- Use feta cheese instead of Monterey Jack
Brown Rice Option
If you prefer brown rice:
- Increase chicken broth to 4½ cups
- Extend cooking time to 35-40 minutes
- Check occasionally and add more broth if needed

Make-Ahead and Storage Tips
This dish is perfect for meal prep and actually tastes even better the next day as the flavors continue to meld together.
Make-Ahead Options:
- Prep Ingredients: Slice the kielbasa and chop all vegetables up to 2 days ahead. Store in separate airtight containers in the refrigerator.
- Partially Cook: You can brown the kielbasa and sauté the vegetables ahead of time. Cool completely and refrigerate for up to 24 hours. When ready to finish the dish, warm the mixture in the pan, then proceed with adding the rice and broth.
- Complete Dish: Make the entire dish up to 2 days ahead. Reheat in a covered skillet over medium-low heat with a splash of chicken broth to prevent drying out.
Storage Guidelines:
| Storage Method | Recommendation | Maximum Time |
|---|---|---|
| Refrigerator | Store in airtight container | 3-4 days |
| Freezer | Portion in freezer-safe containers | 2-3 months |
| Reheating (Refrigerated) | Microwave 2-3 minutes or stovetop with a splash of broth | Best within 3 days |
| Reheating (Frozen) | Thaw overnight in refrigerator, then reheat | Consume within 1 month for best quality |
Serving Suggestions
I like to serve this Cheesy Kielbasa and Rice as a complete meal since it contains protein, starch, and vegetables, but here are some great pairings to round out your dinner:
Side Dishes:
- Crisp green salad with vinaigrette dressing
- Steamed broccoli or green beans
- Roasted Brussels sprouts with bacon
- Garlic bread or crusty sourdough
- Cucumber and tomato salad
Dessert Pairings:
- Apple crisp with vanilla ice cream
- Lemon bars
- Chocolate pudding
- Fresh fruit salad with whipped cream
Common Recipe Mistakes to Avoid
After making this recipe countless times, I’ve learned what can go wrong. Here are some pitfalls to avoid:
- Not browning the kielbasa properly: This step adds tremendous flavor. Don’t rush it!
- Using too high heat for the rice: Keep it at a gentle simmer to avoid burning the bottom.
- Opening the lid too often: This lets steam escape and can result in undercooked rice.
- Adding all the cheese at once: Incorporate it gradually for the smoothest, most even melt.
- Using pre-shredded cheese: These contain anti-caking agents that can make your sauce grainy. Grate your own for the creamiest result.
- Not letting the dish rest: A 5-minute rest after cooking helps the flavors meld and the texture improve.
Kitchen Tools That Make This Recipe Easier
While this recipe doesn’t require specialized equipment, these tools make preparation smoother:
- Cast iron skillet or Dutch oven: Provides even heat distribution and goes from stovetop to table beautifully.
- Box grater: For freshly shredded cheese that melts perfectly.
- Good chef’s knife: Makes quick work of slicing kielbasa and dicing vegetables.
- Silicone spatula: Gently folds in cheese without scratching your cookware.
- Instant-read thermometer: Ensures rice reaches food-safe temperature (165°F) when reheating leftovers.

Frequently Asked Questions
Q: Can I use a different type of sausage instead of kielbasa?
Absolutely! Polish kielbasa is my preference for its smoky flavor and firm texture, but you can substitute any smoked sausage, andouille, or even sliced chicken sausage. Each will lend its own unique flavor to the dish.
Q: My rice always turns out mushy. What am I doing wrong?
The key to perfectly cooked rice is maintaining the right liquid-to-rice ratio and cooking temperature. Make sure you’re using 2 cups of rice to 4 cups of broth, and keep the heat low once the liquid comes to a boil. Also, resist the urge to constantly stir the rice as it cooks—this releases more starch and can lead to a gummy texture.
Q: Can I make this recipe with brown rice instead?
Yes! Brown rice requires more liquid and a longer cooking time. Use 4½ cups of broth instead of 4, and expect to simmer for 35-40 minutes rather than 15-18. Check occasionally during cooking to ensure there’s enough liquid, adding more broth if needed.
Q: Is there a way to make this recipe lighter or lower in calories?
Several adjustments can make this dish lighter: use turkey kielbasa instead of pork, reduce the cheese by half, and increase the vegetables. You can also use brown rice for more fiber, which helps with satiety.
Q: My kids don’t like bell peppers. What can I substitute?
For picky eaters, you can either omit the bell peppers entirely or substitute with milder vegetables like carrots (finely diced) or even frozen peas (added in the last few minutes of cooking). Sometimes I even finely grate zucchini, which practically disappears into the dish while adding nutrition.
Q: The bottom of my rice got burned. How can I prevent this?
This typically happens when the heat is too high or the pot is too thin. Make sure to reduce the heat to low once the liquid begins to boil, and consider using a heavy-bottomed pot or Dutch oven for more even heat distribution. A heat diffuser placed under your pot can also help if you have a particularly hot stovetop.
Q: Can I make this in a rice cooker or Instant Pot?
For a rice cooker: Brown the kielbasa and vegetables in a skillet first, then transfer to your rice cooker along with the rice, broth, and seasonings. Cook on the regular rice setting, then stir in the cheese once the rice is done.
For an Instant Pot: Use the Sauté function to brown the kielbasa and vegetables. Add the rice, broth, and seasonings, then cook on High Pressure for 5 minutes with a 10-minute natural release. Stir in the cheese after releasing the pressure.
Q: The dish seems too liquidy. What should I do?
If there’s too much liquid after the rice is cooked, uncover the pot and cook over low heat for a few more minutes to allow excess moisture to evaporate. Remember that the dish will also thicken slightly as it cools.
My Personal Story With This Recipe
I first created this recipe during a particularly cold winter when my family was craving something warm and comforting. We had just moved to a new home, and I was looking to create a “house specialty” – a signature dish that would become associated with gatherings in our new space.
What started as a simple “clean out the refrigerator” meal quickly became requested at every family dinner. My daughter, who normally picks around vegetables, would clean her plate entirely. My husband started requesting it for his birthday dinner. Even my mother-in-law – a wonderful but critical cook – asked for the recipe!
Over the years, I’ve made this dish for new parents needing an easy meal, for potlucks where I needed something that would please a crowd, and countless weeknight dinners when time was short but hunger was high. The beauty of this recipe is that while it feels special enough for company, it’s simple enough for a Tuesday night.
I hope this dish brings as much comfort and joy to your table as it has to mine over the years. Food has always been my way of showing love, and this Cheesy Kielbasa and Rice recipe is like a warm hug served on a plate.
Final Tips for Success
Before you head to the kitchen, here are my final tips to ensure your Cheesy Kielbasa and Rice turns out perfectly every time:
- Taste as you go: Chicken broths vary in saltiness, so taste before adding additional salt.
- Rest the dish: Allow it to sit, covered, for 5 minutes after cooking to let the flavors meld.
- Use room temperature cheese: Take your cheese out of the refrigerator while the rice cooks for smoother melting.
- Trust your instincts: If the rice seems too firm or there’s too much liquid after the suggested cooking time, adjust accordingly. Your stove and pot will perform differently than mine.
- Make it your own: Once you’ve mastered the basic recipe, don’t be afraid to experiment with additions that suit your family’s taste.
I truly believe the best recipes are the ones that evolve over time and carry memories within them. I can’t wait to hear how this dish becomes part of your own family’s story!
Questions & Answers
Q: What type of kielbasa works best for this recipe?
Any smoked Polish kielbasa works wonderfully, but I prefer the traditional pork variety for its rich flavor. Turkey kielbasa is a great lighter alternative that still provides good flavor. Look for kielbasa with a firm texture and visible specks of garlic and spices for the most authentic taste.
Q: How can I tell when the rice is perfectly cooked?
Perfectly cooked rice should be tender but still have a slight resistance when bitten – similar to al dente pasta. All the liquid should be absorbed, and you should see tiny holes on the surface where steam has escaped. If you’re unsure, take a few grains and taste them. They should have no hard center but shouldn’t be mushy either.
Q: Can I add other cheeses besides cheddar and Monterey Jack?
Absolutely! This recipe is very forgiving when it comes to cheese variations. Gouda adds a wonderful smokiness, pepper jack brings a nice heat, and a touch of cream cheese can make the dish extra creamy. Just keep the total amount of cheese the same, and make sure at least half is a good melting cheese.
Q: How spicy is this dish, and how can I adjust the heat level?
As written, this recipe is very mild and family-friendly. To increase the heat, you can add cayenne pepper (start with ¼ teaspoon), red pepper flakes, or a diced jalapeño with the vegetables. For an extra kick, use hot paprika instead of regular or smoked. To keep it even milder, make sure to use a kielbasa labeled “regular” rather than “hot” or “spicy.”
Q: Is there a lower-carb version of this recipe?
For a lower-carb option, you can substitute cauliflower rice for half or all of the regular rice. If using cauliflower rice, reduce the liquid to 1-2 cups and decrease the cooking time significantly – cauliflower rice only needs about 5-7 minutes to cook through. You’ll still get all the cheesy, smoky flavor with fewer carbohydrates.
Q: How far in advance can I prepare this for a potluck?
This dish holds up exceptionally well for potlucks! You can make it up to 24 hours in advance and refrigerate it in an oven-safe dish. To reheat, add 2-3 tablespoons of chicken broth, cover with foil, and warm in a 325°F oven for about 20-25 minutes until heated through. Alternatively, you can reheat it in a slow cooker on low for 1-2 hours, which works beautifully for keeping it warm during gatherings.
Q: What’s the best way to reheat leftovers without drying them out?
The microwave works well for individual portions – cover your dish with a damp paper towel and heat on 70% power for 1-2 minutes, stirring halfway through. For larger amounts, reheat in a skillet over medium-low heat with a splash of chicken broth or water, stirring occasionally and keeping it covered between stirs. This maintains the creamy texture without scorching the bottom.
Q: Can this recipe be made vegetarian?
Yes! Substitute the kielbasa with a plant-based sausage or 2 cups of sautéed mushrooms for a meaty texture. Use vegetable broth instead of chicken broth, and you’ll have a delicious vegetarian version. Adding a teaspoon of smoked paprika helps compensate for the smoky flavor that the kielbasa would typically provide.

